I have been clearing out again, which means donating clothes etc. to charity. Yes, the whole point is to have less. So, in I go to St Vinnies to drop off a bag and ........................ left with this lot for $4.50! - two Vogue patterns, hem facing, bias, piping cord and etc.
Completely missed the point of that whole exercise!
In my defence - I don't have many bouses in my wardrobe and I think I may have just doubled my blouse patterns. Yeah, I forgive myself - there were extenuating circumstances (my eyes were open).
adventures in photography, travelling, sewing, general crafting and whatever I'm up to at the time.
Thursday, May 3, 2012
Monday, April 30, 2012
My sewing room organisation ....
I am fortunate to have a dedicated sewing room, all for me, me, me. Mind you, our house nearly broke in half due to the earth bank under one end of it collapsing (the house is built into the side of a hill) and as we had to do so much to fix the situation I suggested that while we were at it, we convert that now extra space into two proper rooms that are an extension of the downstairs part of our house. Yes, rather drastic measures to get a sewing room but a girl's gotta do what a girl's gotta do right? I did suggest that the other (bigger) room be tigerboy's workshop which I thought was pretty generous. It's a small room but I'm grateful to have it.
I considered tidying it before taking pics but ............ well, I couldn't be bothered, sometimes it's best to just get on with it or it'll never be done right?
Unlike tigerboy who spent many, many weeks fitting out his workroom and makes sure it always looks immaculate by way of not using it, I do use my sewing room and wasted no time in starting to use it. As such, I haven't finished organising it - it's still a work in progress and probably will be for quite a while - I want to use it already!
Ok, so here we go .....
My cutting table:
Bookcase:
The boxes of patterns & the overlocker (serger) thread:
My old machine:
The rest of the machine bench:
The machine feet & bobbin drawer:
This is the top drawer at the other end of the bench.
The thread drawers:
This is where all of my thread lives.
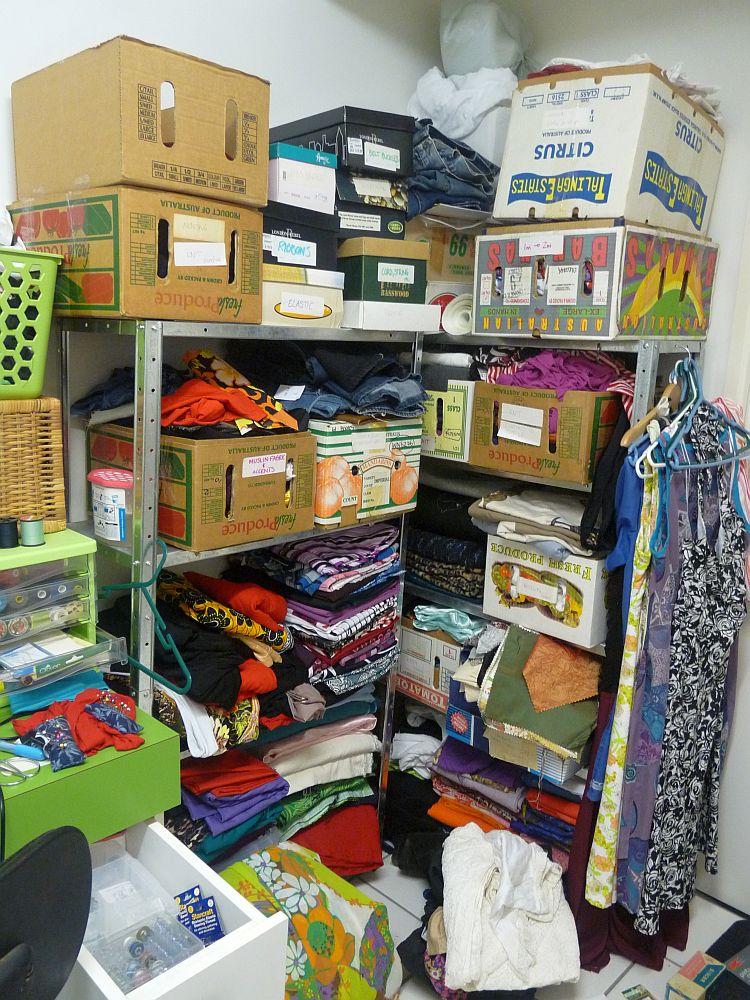
The fabric stash:
Machine needle pin cushion:
Never able to remember which needle you left in the machine? It was always a problem for me. Now that my eyesight is failing, sometimes I can't even read the markings on the needle when I'm wearing glasses (esp. the cheap needles, I don't think they always print correctly ........ or maybe my eyesight is even worse than I think). I'd read about putting a sticker on the machine and writing the needle type on it, keeping a post-it notepad handy and using those and a few other variations on the theme but I couldn't find the pen and/or notepad or whatever I needed at the time (or I'd just completely forget), so those methods just didn't work for me.
Anyway, this is the solution I'd been looking for. I read about this idea some time last year - what an excellent idea, so easy.

My low tech fabric catalogue:
Yes, I know I could do this in Excel (as tigerboy suggested ........ of course) but I wanted something quick, easy, convenient and portable, I mean, I'm not planning WWIII here.
It's not complete but it's getting there and it's been really useful.
Basically it's divided into stretch and non-stretch, within those categories are widths - ~90cm, <=120cm, >120cm, then I write down the pertinent details.
When I want to make something I take a quick look through here to see what I have that suits.
The portable tool box:
Tigerboy and I tiled the floor ourselves. A tile floor is not the best idea for a sewing room. I've had to 'fix' a few tools that have fallen - sharp ends aren't sharp anymore after smashing on to tile - the quick-unpick, more than one pair of small sharp scissors and my chaco marker to name a few. I had to get the pliers to the chaco marker to straighten out the little metal teeth, for the scissors and quick-unpick I used a really fine emery to remove the burrs. Vinyl or lino would be a better choice, as unappealing as they sound.
So, there you go. I hope someone gets some tips from this.
I considered tidying it before taking pics but ............ well, I couldn't be bothered, sometimes it's best to just get on with it or it'll never be done right?
Unlike tigerboy who spent many, many weeks fitting out his workroom and makes sure it always looks immaculate by way of not using it, I do use my sewing room and wasted no time in starting to use it. As such, I haven't finished organising it - it's still a work in progress and probably will be for quite a while - I want to use it already!
Ok, so here we go .....
My cutting table:
- I've added a hook and some nails at the end there to hold rulers, tape measures, shoddy paper scissors and whatever else I shove on them.
- I got the self healing mat from ebay, it's just slightly bigger than the table which is approx 130cm x 100cm I think. In reality, I still often have to do my cutting out in the foyer on the floor because as cutting tables go, it kind of small when you're dealing with metres of fabric and I'm always trying to work out how I can fit a pattern that needs 6 metres of fabric onto a 2 metre piece.
- The table was a bit low and I also wanted it moveable, so I bought some castors on ebay and had tigerboy hollow out some bits of wood for the legs to sit in and attached the castors to the bottom of the wood.
- Those tubs under the table? Huge lengths of knit.
Bookcase:
- I picked this up from Bargain City for ~$20 - it's still unorganised and I just keep jamming things in there like WIP's.
- Some of my sewing books are in there but the majority are still upstairs.
- It does have my pattern folders in it though (the group of black spines with white labels). I use the plastic binders with the clear inserts to put the pattern envelopes in. The actual innards of the patterns I put in ziplock bags in boxes. This way, when I'm deciding what to make etc. I can just grab the binders and take them where ever to flick through, I don't need to trawl through boxes of patterns (not that my pattern stash is very impressive compared to a lot of people's).
- You can see some shoeboxes with notions in them - the majority of those are upstairs too, I tend to bring them down as I need something and then find a home for them (or, more accurately, somewhere to shove them) in the sewing room.
The boxes of patterns & the overlocker (serger) thread:
- Under the window you can see some shelving from our old kitchen. Those are copy paper boxes full of ziplock bags with patterns in them.
- On the right is the start of my sewing bench. The drawers are really deep, the top one is perfect for overlocker spools.
- To the left are the mirrors. We bought a full length mirror to stick on the wall because I couldn't find any free standing ones in the stores - and I checked a lot of stores. But, I need to move the mirror around so I didn't want to stick it on the wall. At the moment it's resting on a plastic tub that is full of stretch woven fabric. Anyway, I bought the cheval mirror on ebay - didn't have much of a selection there either - and now I use them so that I can see the front and back of clothes. Not great but better than nothing and better than running upstairs to check in the closet mirror!
- You can see Dot behind the cheval holding up a couple of vogue dresses - haven't reviewed those yet, one needs hemming and I'm still deciding whether I should bother to try to save the other.
My old machine:
- This is my trusty old Janome that my grandmother gave me when I was hmmm, well it was well over 20 years ago.
- The drawer under the machine has the machine manuals, tools and overlocking samples in it. (Basically, I record the settings for the overlocker for various fabrics by writing them on the little test piece and tossing it in the drawer.)
![]() |
| an overlocking sample |
The rest of the machine bench:
- Unfortunately my pc down here can't pick up the signal from the router upstairs but I do use it to listen to audio books while I'm sewing (although lately it's all been Michel Thomas teaching me Spanish - I don't really concentrate on it, often I'm not even conciously listening, so I end up listening to the same stuff over and over but I figure it has to be doing some good right?). When I'm not listening to Michel, I'm listening to non-fiction audio books - I don't listen well enough to follow the thread of a story (and I'm not keen on having fiction read to me), so I find that non-fiction is good. I can listen to the same book a lot of times, tuning in and out before I feel like I've actually heard it all.
- Behind the back of the chair you can just see my dodgy arrangement for catching the offcuts from the overlocker - a little plastic bag. I keep meaning to upgrade ......... one day.
- My overlocker is a Lumina - Aldi sell them. Actually I intend to do a post on it at some stage because all I've ever been able to find on the web is people asking if they're any good (and quite often others that have never used one or known anyone that has used one advising against buying them) - it's fine, a heck of a lot better than the old Janome Mylock I have (that I want to give away - if you're reading this and you're in Brisbane, you can have it, it's on the northside!).
- My Brother sewing machine - well, it's a basic machine, nothing to write home about, some annoying things but certainly useable (clearly, or else it would be packed away like that old Janome overlocker).
The machine feet & bobbin drawer:
This is the top drawer at the other end of the bench.
- I've got a bobbin box for my new machine, two bobbin boxes for the old machine, a bobbin box full of full bobbins that I just got from Mum (they don't fit her new machine but they'll fit mine).
- I also got two plastic fishing tackle boxes to hold most of the different machine feet.
The thread drawers:
This is where all of my thread lives.
- I picked this set of drawers up at Big W and the drawers are the perfect size for reels of thread (except those cheapies sitting on the top - they're too fat).
- The top three drawers are in colours: red/pink/orange/purple, blue/black/grey, white/yellow/brown/green.
- The bottom drawer has one of those cheap sets where you get ~20 reels of thread with 20 full, matching bobbins (those bobbins just happen to fit my new machine) as well as some other little el cheapo reels.
- The other drawer has copy paper, marking tools, needles for hand sewing and quick-unpicks.
- Those boxes on top of the drawers have scrap fabric. I pull pieces out to make sure the stitch is going to work or try something new before I mess up the 'real' fabric.
The fabric stash:
- Not all of this is stash, some is mending, some of it is slated to be refashioned.
- You can see there are actually garments hanging at one end - they need to be changed in some way before I'll wear them again.
- More notions boxes at the top.
- There is an entire box of jeans in there - I just used 3+ pairs making the Palin bag for tigerboy, more about that in another post (like, when I finally finish the thing).
- I've got a single/double bed mattress protector that's going to be batting (we no longer have single or double beds).
- One of those boxes is full of fabric that will only ever be muslins or linings.
- If you view the bigger pic you might even be able to read the labels.
Machine needle pin cushion:
Never able to remember which needle you left in the machine? It was always a problem for me. Now that my eyesight is failing, sometimes I can't even read the markings on the needle when I'm wearing glasses (esp. the cheap needles, I don't think they always print correctly ........ or maybe my eyesight is even worse than I think). I'd read about putting a sticker on the machine and writing the needle type on it, keeping a post-it notepad handy and using those and a few other variations on the theme but I couldn't find the pen and/or notepad or whatever I needed at the time (or I'd just completely forget), so those methods just didn't work for me.
Anyway, this is the solution I'd been looking for. I read about this idea some time last year - what an excellent idea, so easy.
- Basically, you use the segments of the tomato to denote the different needle sizes (label them, so that you don't forget what is what).
- I have also divided mine horizontally for the different types of needles: ball/stretch; universal; sharp.
- When I put a needle in the Brother, I put a blue topped pin in the correct segment. For the other machine, I use a different coloured pin.
- If I'm using a specialty needle, like a twin, or just don't have a needle in there, I put the corresponding pin in the chilli.
- The only problems I've had is that a couple of times I've taken the pin out without thinking, to actually use as a pin (idiot!!).
![]() |
| Yep, I know that pin at the top is bent - it just hasn't made it to the bin yet. |

My low tech fabric catalogue:
Yes, I know I could do this in Excel (as tigerboy suggested ........ of course) but I wanted something quick, easy, convenient and portable, I mean, I'm not planning WWIII here.
It's not complete but it's getting there and it's been really useful.
Basically it's divided into stretch and non-stretch, within those categories are widths - ~90cm, <=120cm, >120cm, then I write down the pertinent details.
When I want to make something I take a quick look through here to see what I have that suits.
![]() |
| See the one on the right that's crossed out? That got turned into Vogue 8555 |
The portable tool box:
- This is an old dishwasher cutlery basket.
- Several pairs of scissors, rotary cutters, chalk pencil, tracing wheel ... basically whatever I think I'll need to carry around.
- In the background (on the left) you can see a cloth, zip up rice bag with handles. We eat a lot of rice in this house, I don't even bother buying it in quantities less than 5 kilos and it comes in these types of bags. I find it really hard to throw them away but they're a bit small to use as shopping bags. I use some in the sewing room for WIPs, sometimes I'll use them for shoes - anyone got any other ideas?
Tigerboy and I tiled the floor ourselves. A tile floor is not the best idea for a sewing room. I've had to 'fix' a few tools that have fallen - sharp ends aren't sharp anymore after smashing on to tile - the quick-unpick, more than one pair of small sharp scissors and my chaco marker to name a few. I had to get the pliers to the chaco marker to straighten out the little metal teeth, for the scissors and quick-unpick I used a really fine emery to remove the burrs. Vinyl or lino would be a better choice, as unappealing as they sound.
So, there you go. I hope someone gets some tips from this.
Saturday, April 28, 2012
My knit dress TNT
Originally I sort of copied a RTW knit dress for this pattern and it has evolved over time. The dress in question was too small, had darts, was backless and various other things I wasn't after, so it was a combination of a basic shape and being reworked to fit my measurements and shape without the features I didn't want and with the features I did want. I thought about using Winfed Aldrich's book but as my other attempt at using her book had yielded an incredibly baggy 'close-fitting' block that had to be altered to within an inch of it's life, I decided this was the better way to go.
This was the first one, made a couple of days before I went to Sydney for a weekend. It was my first attempt at knit bindings which got better as they went along. Unfortunately, the dress was a bit too short and too 'fitted' for me and tended to ride up with wear - not good unless you're keen on constantly pulling your dress down and/or showing the world your taste in underwear. The big problem with this fabric? Those lines of squares were printed wonky - not even a slight diagonal but an arc! Grrrrr! I have another length of this fabric in a different colourway. It's some kind of synthetic, very thin knit. I think it was about $2 a metre. This is the only pic and that trip is probably the only time I'll ever wear it unless I lose weight which, with my work out regimen (apparently, it's not enough to just have the gym membership, you actually need to attend) is unlikely.
Second iteration - I've made it long enough to forego the tights and given it sleeves and a funnel neck. Another very thin synthetic knit that tigerboy thinks feels slinky - I think it feels a bit plasticky. What was I thinking making a sleeved dress in a thin, plasticky fabric? There aren't too many days of the year I'm willing to wear this one, just thinking about it makes me feel like I'm sweating. Of course I also made it bigger, naturally, it was too big this time and the hip curve wasn't right so, on, off, on, off, on, off, trying to mark where it should be. Well, lesson learned there - I hadn't overlocked the neck and all of that on and off, squeezing it over my head every time resulted in runs in the fabric from the neck down. I was still determined to have a slight funnel neck so I had to make a new neck/chest to insert - the pattern is so busy you can't tell but it's there - kind of shaped like a small bib. I drafted the sleeves and they don't really have the traditional sleeve shape but hey, I think they work just fine (wouldn't attempt that in a woven though) - to be honest, drafted is severely overstating it, I just traced the armhole for the top part of the sleeve, extended the sides down to the length and brought them in to the width I wanted at the bottom, nope, not the traditional sleeve shape at all. I also had a sway back issue to deal with - a slightly curved (down) horizontal tuck graduating to nothing at the side took care of that. The front neckline could do with a little more room - I always forget that my neck (and presumably everyone else's) goes forward - you need to allow for that. In the side view it looks like it's kicking out at the back - that would be because I'm doing my trademark twist to see if the camera has taken the pic yet.
Third iteration. I threw this one together one day to go out to dinner that night. You'd think that I would have marked the hip curve on the pattern wouldn't you? Especially after wrecking the neck on the previous one but oh no, no I didn't. This one was intended to be for winter, it's a ribbed knit with maybe some cotton in it but it still feels very synthetic. I didn't bother with the sway back tuck for this one because I planned to wear it with a belt.I lightened the first pic so that you could see the ribs - check out those glowing legs! I used the blind hem stitch on my machine for this dress - first time I've ever used it - and it worked perfectly on this fabric, awesome! I think I should have slightly pegged the skirt, oh well, it's not likely to get worn much in Queensland anyway. I do normally wear black shoes with it but as you may have guessed, I don't really go all out for these photoshoots.
The fourth iteration (and, I think the only one to be made this year). Wouldn't you know it, this was the night before we had to get up at 4am to fly to Sydney. "Easy, peasy" I think to myself, "I'll just get the pattern out, and knock it up before I go to bed". Well, that might have been true had I been able to find the pattern - after a long time of frantically searching for it I realised that I'd have to start from square one ........ again. So, a search through my clothes to find the previous dresses, copy one of those and ok, now I can kind of relax and knock it up. Yet another very thin synthetic knit, although this one is really soft (read, difficult for my SM to handle) and not plasticky. I have a lot of this fabric. Years ago I made a black skirt for travelling from it (actually I made two - wasn't happy with the first one), a couple of hours before the cab to take us to the airport was about to arrive - tigerboy was practically hyperventilating, at least it took his mind off his fear of flying ;-)
Quite a bit of last-minute sewing happens in tiger world, tigerboy is slowly learning not to let it drive him nuts (he's the kind that starts packing for a trip a month before hand, with the aid of his regularly checked and updated excel spreadsheet - I kid you not! Thankfully, my spontanaeity sends him so bonkers that he's usually speechless until it's all over and then I can talk him back down.) He's trying to be proactive, a couple of months ago he told me that I needed to plan my sewing for a trip to South Korea, Iceland, England and Spain ha ha ha, it's not happening for months, of course I'm not starting now. Good try tigerboy!
And wouldn't you know it? I've now found the lost pattern, complete with sleeves and bib neck for the next neck I stuff up - any wonder I couldn't find it, I'd put it where it was meant to go with all of my other patterns, as if I would have looked there!
This pattern I made is exactly the same for front and back - I just put the sway back tuck in after the fact and rely on the stretch factor to compensate for the boobs. I think I'll branch out into one with a shaped centre back seam or at least some front darts ........ still thinking on it.
EDIT: I forgot, the slinky dress was also made with this pattern.
This was the first one, made a couple of days before I went to Sydney for a weekend. It was my first attempt at knit bindings which got better as they went along. Unfortunately, the dress was a bit too short and too 'fitted' for me and tended to ride up with wear - not good unless you're keen on constantly pulling your dress down and/or showing the world your taste in underwear. The big problem with this fabric? Those lines of squares were printed wonky - not even a slight diagonal but an arc! Grrrrr! I have another length of this fabric in a different colourway. It's some kind of synthetic, very thin knit. I think it was about $2 a metre. This is the only pic and that trip is probably the only time I'll ever wear it unless I lose weight which, with my work out regimen (apparently, it's not enough to just have the gym membership, you actually need to attend) is unlikely.
Second iteration - I've made it long enough to forego the tights and given it sleeves and a funnel neck. Another very thin synthetic knit that tigerboy thinks feels slinky - I think it feels a bit plasticky. What was I thinking making a sleeved dress in a thin, plasticky fabric? There aren't too many days of the year I'm willing to wear this one, just thinking about it makes me feel like I'm sweating. Of course I also made it bigger, naturally, it was too big this time and the hip curve wasn't right so, on, off, on, off, on, off, trying to mark where it should be. Well, lesson learned there - I hadn't overlocked the neck and all of that on and off, squeezing it over my head every time resulted in runs in the fabric from the neck down. I was still determined to have a slight funnel neck so I had to make a new neck/chest to insert - the pattern is so busy you can't tell but it's there - kind of shaped like a small bib. I drafted the sleeves and they don't really have the traditional sleeve shape but hey, I think they work just fine (wouldn't attempt that in a woven though) - to be honest, drafted is severely overstating it, I just traced the armhole for the top part of the sleeve, extended the sides down to the length and brought them in to the width I wanted at the bottom, nope, not the traditional sleeve shape at all. I also had a sway back issue to deal with - a slightly curved (down) horizontal tuck graduating to nothing at the side took care of that. The front neckline could do with a little more room - I always forget that my neck (and presumably everyone else's) goes forward - you need to allow for that. In the side view it looks like it's kicking out at the back - that would be because I'm doing my trademark twist to see if the camera has taken the pic yet.
Third iteration. I threw this one together one day to go out to dinner that night. You'd think that I would have marked the hip curve on the pattern wouldn't you? Especially after wrecking the neck on the previous one but oh no, no I didn't. This one was intended to be for winter, it's a ribbed knit with maybe some cotton in it but it still feels very synthetic. I didn't bother with the sway back tuck for this one because I planned to wear it with a belt.I lightened the first pic so that you could see the ribs - check out those glowing legs! I used the blind hem stitch on my machine for this dress - first time I've ever used it - and it worked perfectly on this fabric, awesome! I think I should have slightly pegged the skirt, oh well, it's not likely to get worn much in Queensland anyway. I do normally wear black shoes with it but as you may have guessed, I don't really go all out for these photoshoots.
The fourth iteration (and, I think the only one to be made this year). Wouldn't you know it, this was the night before we had to get up at 4am to fly to Sydney. "Easy, peasy" I think to myself, "I'll just get the pattern out, and knock it up before I go to bed". Well, that might have been true had I been able to find the pattern - after a long time of frantically searching for it I realised that I'd have to start from square one ........ again. So, a search through my clothes to find the previous dresses, copy one of those and ok, now I can kind of relax and knock it up. Yet another very thin synthetic knit, although this one is really soft (read, difficult for my SM to handle) and not plasticky. I have a lot of this fabric. Years ago I made a black skirt for travelling from it (actually I made two - wasn't happy with the first one), a couple of hours before the cab to take us to the airport was about to arrive - tigerboy was practically hyperventilating, at least it took his mind off his fear of flying ;-)
Quite a bit of last-minute sewing happens in tiger world, tigerboy is slowly learning not to let it drive him nuts (he's the kind that starts packing for a trip a month before hand, with the aid of his regularly checked and updated excel spreadsheet - I kid you not! Thankfully, my spontanaeity sends him so bonkers that he's usually speechless until it's all over and then I can talk him back down.) He's trying to be proactive, a couple of months ago he told me that I needed to plan my sewing for a trip to South Korea, Iceland, England and Spain ha ha ha, it's not happening for months, of course I'm not starting now. Good try tigerboy!
And wouldn't you know it? I've now found the lost pattern, complete with sleeves and bib neck for the next neck I stuff up - any wonder I couldn't find it, I'd put it where it was meant to go with all of my other patterns, as if I would have looked there!
This pattern I made is exactly the same for front and back - I just put the sway back tuck in after the fact and rely on the stretch factor to compensate for the boobs. I think I'll branch out into one with a shaped centre back seam or at least some front darts ........ still thinking on it.
EDIT: I forgot, the slinky dress was also made with this pattern.
Labels:
2011,
2012,
clothing,
diy,
dress,
pattern drafting,
self drafted,
stretch
Friday, April 20, 2012
Refashion - Midi length halter wrap around to throw on day dress.
I wish I'd taken a before pic of this dress. The dress was slightly longer than mid calf but not quite long enough to be a maxi - unflattering length on me. It was a halter neck that was built for an A cup, I'm not an A cup. Due to the fact that it was slightly too large, it gave some coverage but not nearly enough when it was pulled up, up, up and tied but you know what? I don't like halter necks, not only do they feel unsafe with regards to public decency laws (you know, you're constantly thinking "I hope this thing doesn't come undone.", no matter how securely it's tied) but also, they give me a neck ache (yeah, that's probably because I've tied them too tight to try to lessen the possibility of flashing everyone. The back bodice piece was kind of baggy but didn't look as though it was meant to be - it had elastic at the top to stop the back falling down and as the dress was too large, it would have without that. The biggest problem? The wrap was approx. 10cm!! What is with these skimpy wraps? Of course, that means it had to be pinned together so that I didn't flash everyone when I breathed but then of course the dress looks weird when it's in motion because it doesn't flow .... at all (no surprise when it's pinned at various points).
So, the obvious question is why, with all of these problems did I buy it? I have no idea - I bought it years ago, wore it once (and actually got a lot of compliments) but as I've said before, I have no patience for dresses that need fussing and constant checking and boy did it ever. It must have been the print that got me.
The refashion:
- Cut off the front and back bodice.
- Estimate the centre front of the skirt and join the two (barely) wrap pieces with a centre front seam.
- Remove the extra length.
- Take in the side seams (thereby closing the hole for the wrap tie).
- Use the extra length removed to make a new bodice - each shoulder seam is a former skirt side seam - the old hem now goes from bottom centre front to bottom centre back - sew up the centre front & back of the new bodice.
- As the dress wasn't as long as the palm maxi had been, I was left with gaps at the sides of the bodice - I cut two panels from the remaining piece of extra length to join the front & back bodices and skirt under the arm holes (using the old hem at the top of the panels).
- I hemmed the rest of the armholes (the bottom part was done, as I'd used the old hem) with the help of wonder tape (because this fabric is a nightmare for my sewing machine).
- So then I was left with the problem of hemming it. I hemmed (no pun intended) and hawed about how to overcome the machine vs nightmare fabric debacle combined with the fact that it was an A-line, so some easing would need to be done. In the end, my impatience got the better of me and I decided to give hemming web a shot. My reasoning was that even though it was an A-line (ie. curved hem), it wasn't very exaggerated, so there would be minimal easing (being such a thin fabric, I figured I'd just stick it down with the web) and that the web is so thin that I didn't necessarily need to have it at the exact bottom of the hem, so I could still have some curve. Well, lo and behold, it actually worked AND it looks good!!
![]() |
| Using the cut off length to make a new bodice. |
So now I've got an easy to wear, impossible to wrinkle throw on dress. It actually looks better in real life than in the pic but you get the idea.
Friday, March 23, 2012
Refashion - Maxi to day dress (The Palm Dress)
I love the look of maxi dresses and I own quite a few but I've found that they just aren't all that practical for me. So often they don't have much covering on the shoulders and/or back which means that unless it's hot, I'll get chilled ('cos that's where I notice it first - which would be why I am known for always carrying a pashmina with me, I have them in a billion colours, solids and prints). Of course when it's hot enough for me to be wearing something that only minimally covers the top of me, all that fabric (particularly if it's synthetic) makes my legs hot. So that means that if I'm at home, I'm walking around with my dress skirt scrunched up to let my legs breathe or worse yet, tucked up into the legs of my underwear! Thankfully I haven't inadvertently done this whilst I've been out of the house but it's probably only a matter of time before I forget myself and assault the general public with that charming image - not elegant!! So, anyhoo, last year I decided that it was time to make my maxis more wearable, ie. a length that doesn't have me fighting to tuck it up into my underwear and possibly commit a grave faux pas. So far I've converted three of them, there's still a few to go though.
This particular dress I actually bought at a charity shop with the intention of shortening it - even if I'd wanted to, there was no way I could have worn it with a bra, just look at that bust, a strapless bra would show right through that hole in the middle and I don't do braless. I loved the print and the fabric is a very thin, very stretchy, very slinky knit - feels gorgeous but I was soon to find out that it is a nightmare to sew with my machines. I don't know what this fabric is called but I have quite a few maxis made out of it and quite a bit of it in my stash (which would be a good thing apart from the aforementioned 'nightmare to sew' bit).
I started this dress about this time last year (yes, last year), I finished it in Oct/Nov. Why the delay? The hem - as I've mentioned, that's where so many of my projects sit languishing for months until I get fed up with seeing them sitting around. In the end I used a double needle to do the hem - it's not a great job, there are some skipped stitches but, meh, it's done and it's been worn quite a bit over the summer. I've had a lot of compliments on it too.
To make it, I basically cut off the extra length all around the bottom, cut that in half and used it to make the top. I very carefully unpicked the top and skirt because I was happy with the way the dress fitted from under the bust and wanted to keep that shape. The new shoulder seams were originally the side seams of the skirt, the original hem is now the neckline (trying to minimise any sewing on this fabric that I can). I sewed the (now) CF together up for afew inches and overlapped where the two top pieces joined the back skirt a smidge. As I'd cut so much length off, I had to cut down the new bodice pieces so that they matched the skirt but I angled the cut out to the (now) sleeves. The sleeves came a long way down my arms and looked a bit stupid but I still wanted more coverage up there, so I sewed in a stretched piece of elastic with zigzag along the new shoulder seams to gather up the shoulders. Of course it didn't gather as much as I'd wanted because elastic never shrinks back to anywhere near it's original size after I've sewn through it but it was enough. I've since read that apparently there is specific elastic to buy for sewing through in order to have it recover, I wonder if it's easily available in Australia. After all that it was just a matter of hemming the new sleeves and skirt which apparently is a 7 month project for me.
As I said, I wore this quite a bit over the summer and I've found that I really should have made the two bodice pieces a bit shorter, sometimes if I'm not sitting up nice and erect (like I should be), the shoulders start to slip off. I had thought I might just do another round on the overlocker where the bodice and skirt meet but I don't really want to go messing with the length. I plan to make spaghetti strap out of the left over fabric and sew it across the back neckline - that should take care of that and I'll be able to slouch all that I want.
This particular dress I actually bought at a charity shop with the intention of shortening it - even if I'd wanted to, there was no way I could have worn it with a bra, just look at that bust, a strapless bra would show right through that hole in the middle and I don't do braless. I loved the print and the fabric is a very thin, very stretchy, very slinky knit - feels gorgeous but I was soon to find out that it is a nightmare to sew with my machines. I don't know what this fabric is called but I have quite a few maxis made out of it and quite a bit of it in my stash (which would be a good thing apart from the aforementioned 'nightmare to sew' bit).
![]() |
| Before |
I started this dress about this time last year (yes, last year), I finished it in Oct/Nov. Why the delay? The hem - as I've mentioned, that's where so many of my projects sit languishing for months until I get fed up with seeing them sitting around. In the end I used a double needle to do the hem - it's not a great job, there are some skipped stitches but, meh, it's done and it's been worn quite a bit over the summer. I've had a lot of compliments on it too.
To make it, I basically cut off the extra length all around the bottom, cut that in half and used it to make the top. I very carefully unpicked the top and skirt because I was happy with the way the dress fitted from under the bust and wanted to keep that shape. The new shoulder seams were originally the side seams of the skirt, the original hem is now the neckline (trying to minimise any sewing on this fabric that I can). I sewed the (now) CF together up for afew inches and overlapped where the two top pieces joined the back skirt a smidge. As I'd cut so much length off, I had to cut down the new bodice pieces so that they matched the skirt but I angled the cut out to the (now) sleeves. The sleeves came a long way down my arms and looked a bit stupid but I still wanted more coverage up there, so I sewed in a stretched piece of elastic with zigzag along the new shoulder seams to gather up the shoulders. Of course it didn't gather as much as I'd wanted because elastic never shrinks back to anywhere near it's original size after I've sewn through it but it was enough. I've since read that apparently there is specific elastic to buy for sewing through in order to have it recover, I wonder if it's easily available in Australia. After all that it was just a matter of hemming the new sleeves and skirt which apparently is a 7 month project for me.
As I said, I wore this quite a bit over the summer and I've found that I really should have made the two bodice pieces a bit shorter, sometimes if I'm not sitting up nice and erect (like I should be), the shoulders start to slip off. I had thought I might just do another round on the overlocker where the bodice and skirt meet but I don't really want to go messing with the length. I plan to make spaghetti strap out of the left over fabric and sew it across the back neckline - that should take care of that and I'll be able to slouch all that I want.
Tuesday, March 20, 2012
Vogue 8555 - The Hibiscus Dress
I made this dress last year out of a small piece of very cheap cotton I'd bought about 6/7 years ago (I think the plan was to make a tote). Anyway, I was not confident of getting a good fit 'out of the packet' and before I wasted my animal print sateen on it, I thought I'd make it out of something I didn't love. (When tigerboy saw the animal print his eyes bugged out "Isn't it a bit cougarish?" "Well, I'm over 40 and with a younger man, I'd say if the print fits, wear it." "Okaaaaaay." Doesn't take much to shock Mr. Conservative.)
I had just enough to make the dress - I've only got a few centimetres left. With my limited amount of fabric I did at least try to get the stripes of dark and light purple to kind of match and I think I did the best I could with what I had.
To start with, I'll just get this right out there in the open for anyone that has spent ages poring over pattern reviews trying to work out if the person in the picture is their size and if so, which size they ended up cutting (I did that, boy did I do that). I'm 168cm tall and my measurements are 94cm (37"), 72.5cm (28.5") with the widest part of my thighs being 99.5cm (~39"). According to those measurements, for this dress Vogue says I'm between a size 14 and 16, actually, nearly exactly smack bang in the middle. Additionally, I have an upper bust measurement of 89cm (35"), so if I went by that, I'd be choosing a pattern between a sz 12 and a 14. To confuse things even further - I'm a D or DD cup, have been ever since I was in high school. Nearly everything I've read says that with only a 2" difference between upper bust and bust, I shouldn't even be a D cup. The thing is, my underbust is the same as my waist, so does this mean I have a narrow back? Gah, all I know is that I always have to make patterns smaller.
I had to make quite a few adjustments. I cut a sz 12 for the armscye and neck, a size 14 for the shoulder (length), sz 14 for bodice sides and skirt. And this was what I got from that. Baggy bodice and baggy skirt.
The bodice alterations:

In the future, I'll just cut a size 12 of course. I also think it is a tad too long in the shoulders, cutting the size 12 for shoulder length would have fixed that.
I used a very old interfacing that I had, it's stiff like cardboard. I remember that years ago when I used it it ended up bubbling, so I didn't actually fuse it to the fashion fabric, I just sewed it in with the fuse side to the lining. The dress would look better if the midriff was fused to interfacing.
For the lining I used an old piece of plisse that came from my Mum's stash - it was only a tiny piece, just enough to line the bodice. Plisse is like a tiny seersucker. Turns out that although I cut the lining 5mm smaller, plisse is not a great lining fabric, due to the weave it has a bit of stretch.
As I'd spent so long fitting this skirt, I actually used it to convert to an A-line when I made the cling wrap bodice dress.
I do plan on making another version, I think I'll incorporate less ease when I make it with the sateen - I'm still planning to go all cougar ;)
I had just enough to make the dress - I've only got a few centimetres left. With my limited amount of fabric I did at least try to get the stripes of dark and light purple to kind of match and I think I did the best I could with what I had.
To start with, I'll just get this right out there in the open for anyone that has spent ages poring over pattern reviews trying to work out if the person in the picture is their size and if so, which size they ended up cutting (I did that, boy did I do that). I'm 168cm tall and my measurements are 94cm (37"), 72.5cm (28.5") with the widest part of my thighs being 99.5cm (~39"). According to those measurements, for this dress Vogue says I'm between a size 14 and 16, actually, nearly exactly smack bang in the middle. Additionally, I have an upper bust measurement of 89cm (35"), so if I went by that, I'd be choosing a pattern between a sz 12 and a 14. To confuse things even further - I'm a D or DD cup, have been ever since I was in high school. Nearly everything I've read says that with only a 2" difference between upper bust and bust, I shouldn't even be a D cup. The thing is, my underbust is the same as my waist, so does this mean I have a narrow back? Gah, all I know is that I always have to make patterns smaller.
I had to make quite a few adjustments. I cut a sz 12 for the armscye and neck, a size 14 for the shoulder (length), sz 14 for bodice sides and skirt. And this was what I got from that. Baggy bodice and baggy skirt.
The bodice alterations:
- Change midriff side seam to between a sz 14 and a sz 12 just under the arm, grading to a sz 12 for the waist.
- Sewed bodice to midriff with a 5mm (under bust)-1cm (sides) seam allowance because I was concerned about the bust pulling the back forward and the midriff not sitting properly under the bust.
- Sway back adjustment in the back midriff (a horizontal tuck of 3cm in total in the centre, graduating to zero at the side seam).

The skirt alterations:
- Lengthen darts on skirt considerably and change hip curve (my biggest part is lower than Vogue thinks it will be).
- Change skirt to size 12.
- Add a vent to the back centre seam of skirt.
In the future, I'll just cut a size 12 of course. I also think it is a tad too long in the shoulders, cutting the size 12 for shoulder length would have fixed that.
I used a very old interfacing that I had, it's stiff like cardboard. I remember that years ago when I used it it ended up bubbling, so I didn't actually fuse it to the fashion fabric, I just sewed it in with the fuse side to the lining. The dress would look better if the midriff was fused to interfacing.
For the lining I used an old piece of plisse that came from my Mum's stash - it was only a tiny piece, just enough to line the bodice. Plisse is like a tiny seersucker. Turns out that although I cut the lining 5mm smaller, plisse is not a great lining fabric, due to the weave it has a bit of stretch.
![]() |
| Plisse lining |
![]() |
| Plisse lining |
As I'd spent so long fitting this skirt, I actually used it to convert to an A-line when I made the cling wrap bodice dress.
I do plan on making another version, I think I'll incorporate less ease when I make it with the sateen - I'm still planning to go all cougar ;)
Friday, March 2, 2012
Blue slinky knit dress - self drafted.
This dress was a nightmare. I started this dress ................. at least 8 months ago, maybe (probably) more and finished it in December. Each step along the way gave me headaches, even the cutting out. I had JUST enough fabric except there were two little holes in it - I had to darn them and thankfully because of the smooshiness of the slinky, you can't even tell. This fabric is probably nearly 15 years old, so who knows if the holes were there when I bought it (quite possible, I think it was a remnant) or whether they developed with age and it's just the beginning of the end.
I've only sewn with slinky knit once before (which would have been around the time I bought this fabric) and it was a very simple two-piece above the knee dress that I made - side seams and shoulder seams only. That was smart!
I could not get my overlocker to play nicely with this and neither of my sewing machines were much better. I couldn't find a stitch on either of my sewing machines that would deal with it. In frustration I pulled out a dress I'd made 15 years ago to see what I used in it which turned out to be the overlock stitch on the old sewing machine. Excellent!! Yeah, would have been except that this particular slinky wasn't having it. In desperation I finally used the stitch that has 2/3 straight stitches with a zigzag - that was going to be the best I could manage but the long seams ended up puckered. You can actually see that at the front - it's still noticeable near the hem - after this sitting around for months I just couldn't be bothered 'fixing' it any more. Of course, when I was making the pattern I hadn't taken into account how much slinky knit stretches lengthwise because of the stretch and weight. I ended up having to cut about 4 inches off the top of the dress. I ended up pinning it together at the shoulders to get the 'right' seam line. I tried various treatments to finish off the armholes but all resulted in a lettuce edge look - not what I was going for, until I bought some wonder tape online and viola! Finally I could neatly finish off the armscyes with a straight stitch (still couldn't get the double needle to play ball I think - either that or I just couldn't be bothered stuffing around with it ........... probably option two).
Then of course I had to deal with the hem (which is where a lot of my creations stall). After at least another month of the little blue scrumpled heap being moved from place to place, I hit upon the idea to use hemming web and iron the sucker in place. By this point I wasn't even going to try sewing it as well - I was well and truly over it. I've used hemming web in the past on jeans and wasn't sure if it would hold up on slinky but I've just washed the dress and it's still holding fast, yippee!
Seems I was twisting in the last pic (probably trying to work out whether the camera had taken the pic or not) which has given it some wrinkles that aren't normally there. I can see it needs a press too - even slinky gets wrinkly after being scruched up on floors and in mending boxes for months on end I suppose.
After the experience of this dress it will be a long, long time before I deal with slinky again (I'm fairly sure there's some in my stash but I'm ignoring it and pretending it's not there!)
Basically, to make this dress I used my self drafted TNT knit dress pattern that I've made several dresses with. Obviously I cut up the pattern to give me the seam lines I wanted and extended the shoulders to give me the caps.
Subscribe to:
Posts (Atom)